Skip to main content
Up to this point all the work had been on large sections of the model but with them all finished it was time to start working on the small bits. For a start I knew I wanted to keep pushing myself and I've also never done the Light/Dark cross hatch often used on magic or power weapons before. See how they came out along with the other bits after the break.
I spent some time considering colours, since I already had fire and lava in both the base and Tzeench runs on the wings, orange was a fairly solid choice. Then I came across the 'Eavy Metal Fateweaver from the box and instructions and the black -Orange/yellow looked like a good plan on the sword as well.
After some trial and error I had narrowed down how to do the dark side. For the blend to black I played with ways to darken Orange by mixing it but decided it wasn't working as the tone and shade where doing odd things. However due the the brighter orange helping to keep the vivid colour browns worked perfectly without mixing. Bestial Brown and Scorched brown provided the mid tones from the black.
After that it was just a matter of carefully and slowly building up and refining the highlights to get the thin orange edge. With the first half done the same careful process was used to highlight the brighter side before adding the finishing touches with gold and the gems. next up was sorting the hand and hilt out before sticking them back together ready to tidy up and fully finish the Blade.
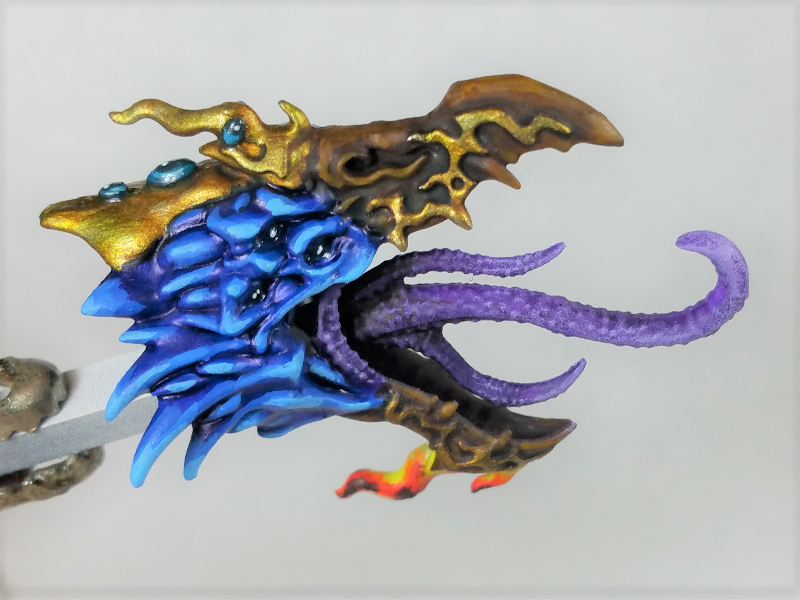
Having taken the best part of two days to paint (which for a bit that size was a bit of a personal record) I moved onto the head. I'd been quite intimidated by the head as it is a little confusing what bit of detail is what. But with the GW web page open with the model pictures up it actually proved fairly easy to get a rough basecoat down.
With that in place there was very little new to consider, and beyond some blending of a few purple wash layers for the tongue and bits around the mouth, it was all straightforward repeats of previous colours. I did take the blue highlights up to Ice Blue to help the face stand out.
With the head done it was time to go back to some orange and work on the staff.
I had the Fateweaver images onscreen again, which helped me block out the colours and work out a rough idea of the transition points for the blending.
After that it was time to get into the fine detail, starting with the flame in the center and very slowly adding edge highlights of the browns and orange to the black. Just like the sword blade but working to trim the highlights narrower and finer with each pass before moving slowly down the haft with the layers. Gently changing the base colour and highlighting up higher as I worked towards the base. I then switched to a yellow base and reverse highlight to get the hot fire effect at the very bottom.
Once the haft was finished from the middle down it was a matter of doing the gold on the base before adding all the gems to finish the lower half.
Now that I had a plan the top half (while still slow and careful) went smother with a bit less need to keep redoing areas just making sure the colour transition balanced with the lower half.
The hand followed the same process as the rest of the model and the only real question was what to do with the staff top. I had plans to do more flames but having looked at it's final position on the model I soon realised it would draw focus away from the face.
Also the gold was much quicker and to be honest I really like it.
With the staff completed there was just two small belt ornaments to go with the dagger and the pouch. The dagger was straightforward as it meant replicating the same techniques already used several times.
The last piece to fall into place was the little pouch of spell components. Most of it used repeats of colours from elsewhere on the model with bone, gold and some pink for tentacle and in the holes. For the bag I didn't want white so just started with scorched brown and worked my way up to screaming skull, after that careful use of red wash and agrax earthshade helped to give a darkened damp zone to the lower portion.
And with the Bag finished the model was complete and ready for a final photo shoot.
Now obliviously I've let posting slip a bit and I've had this post in progress for several weeks now. Back at the end of February I started a new job and I've also had assignments due which has impacted me getting sat down and typing done.
How things go forward will depend on a few things
- firstly sorting the final pictures to share is tricky at work as I don't have my google Drive set up on the work laptop
- secondly I only get a half hour lunch to get things written and that can be burnt up just getting photos uploaded.
- finally I have 2 more assignments and an exam all before the end of May so I'll be having to work on that little lot.
I will try to sort photos out and since I've spent several posts talking about the lord of change I shouldn't need much text to go with it. Then it's gone a bit quite on the modelling front right now so it could be a bit of a gap again before the next post.
So until next time whenever that is TTFN.


Comments
Post a Comment